Monday, July 08, 2013

How to Create a CON Folder in Windows?

How to Create a CON Folder in Windows?


Create CON Folder in WindowsHave you ever tried to create a CON folder or any folder with names such as “con”, “prn”, “nul” “com1″ “com2″ “lpt1″ etc. but failed? Is it impossible to create folders with such names in windows?
Well, the answer is NO and YES!
NO because, when create a new folder and try to rename it to any one of the above specified names, you know what happens! In Windows XP the folder name automatically changes back to “New Folder” no matter you try to renaming it any number of times. Where as in case of Windows Vista and Windows 7, when you try to rename the file you get an error message saying “The specified device name is invalid”.
What is the reason behind this? Simple, these names represent the internal devices of the operating system and hence we cannot create folders with the above names.
YES because it is still possible to create these folders using some simple methods as explained below:

1. Using the Command Prompt:

Here is a step-by-step procedure to create the “con” folder using the command prompt:
  1. Go to the command prompt:
  2. Type in the command prompt (For ex. To create a folder in the E: drive by name: “CON”)
    C:\>md \\.\e:\con
    NOTE: “con” can be replaced by any other names such as “prn”, “nul” “com1″ “com2″ “lpt1″ etc.
  3. In case if you wish to delete the folder, use the following command:
    C:\>rd \\.\e:\con
NOTE: This folder can only be deleted from the command prompt. You cannot remove it by right-click delete.

2. Using ALT Key and Numeric Keypad:

You can also use the Alt key and the Numeric keypad to accomplish the same job in a much easier way. Here is how you can do it:
  1. Create a New folder (Right-click -> New -> Folder)
  2. Once the new folder is created, right-click on it and select the option “Rename”.
  3. Hold down the ALT key and type 0160 from the numeric keypad (ALT+0160) and release the ALT key.
  4. Now, the folder name should go blank so that you can type any name of your choice such as “con”, “prn” “nul” etc. and press Enter. That’s it, you’re done
    !

0 comments:

Comment here / Ask your Query !!

How to Make An Invisible Password Protected Folder

How to Make An Invisible Password Protected Folder


Password-protected-folderDo you want to password protect your folder? Do you want to make it invisible so that it remains unnoticed by other users of your PC? Well, here is a way to do that.
In this post, I will show you how to make an invisible password protected folder in Windows without using any additional software.

How to Create a Password Protected Folder?

Here is is step-by-step procedure to do this:
Step-1: Create a new folder (Right-click -> New -> Folder) and give it any name of your choice. For instance I name it as ABC.
Step-2: Now, in this folder place all the important files, documents or any folders that you want to password protect.
Step-3: Right-click on this folder (ABC) and select the option Send To -> Compressed (zipped) Folder.
Step-4: Now a new compressed zipped folder gets created next this folder (ABC) with the same name.
Step-5: Double-click on this compressed zipped folder and you should see your original folder (ABC) here.
Step-6: Now go to the File menu and select the option Add a password (File -> Add a password)
Now a small window will pop up and here you can set your desired password. Once the password is set, the folder will ask for the password every time it is opened. Thus ,you have now created the password protected folder.

How to Make the Folder Invisible?

Step-1: Right-click on this password protected folder and select Properties.
Step-2: At the bottom select the option Hidden and press OK. Now your folder gets invisible (hidden).
Step-3: In order to unhide this folder, go to My Computer -> Tools -> Folder options. Switch to View tab, scroll down and under Hidden files and folders you’ll see the following two options:
  • Do not show hidden files and folders.
  • Show hidden files and folders.
Select the second option and press OK. Now the invisible folder becomes visible in its location. To access it you need the password. To make it invisible again, repeat step -1 through step-3 and select the first option and click OK. Now, the folder becomes invisible once again.
I hope that you’ve now understood how to create an invisible password protected folder in Windows. If you like this post, pass your comments! Cheers
:)

0 comments:

Comment here / Ask your Query !!

Hack Into Administrator Account

Hello friends, welcome back today i am going to share with you all possible ways to hack admin or administrator account in windows XP. Today i will explain how to hack admin or administrator account in just 2 minutes. So guys get ready to hack your friends systems in 2 minutes.
Most of times specially in our college we don't have the access to the admin account, now suppose you want to install a software on that system. What you will do now? Ask the admin to enter the password for you or simply hack it by yourself. I will tell you frankly that i have never opted method one in my life. Whenever i need administrator right i have hacked it but guys don't do it like that ways because i got suspended from lab twice for doing that.
how to hack admin password,hacking password,reset admin password, system hacking

There are four ways to hack the admin password:
1. Simply accessing Unprotected Administrator Account.
2. Hacking Through Net User Command.
3. Hacking Using the ERD(Emergency Rescue Disk)  Commander.
4. Resetting admin password using Ubuntu Live CD or DVD. 

Lets start from the first technique to hack the admin or administrator password..

1. Simply Accessing the Unprotected Admin or Administrator account.

How this hack works ? When we install windows XP on our system we usually rename the username as our name or some other keyword. But windows always creates the administrator account whenever we set up windows XP. So when you create your user account during install , windows creates two accounts that is one is your username account and other is Administrator account. But the main thing is that you will only see the account with your username and the Administrator account is hidden but its there and you can easily access that using the following steps:
Step1: Start your computer.
Step2: Now let it start until the windows user's username appears as shown in snapshot below...
how to hack admin password,hacking password,reset admin password, system hacking

Step3: As This Window Appears Press Ctrl+Alt +Delete (2 times).. Now the Windows like shown below appears..

how to hack admin password,reset admin password,hack computer password

Step4: Now as shown above Enter the Administrator on the Username box and press enter... Now you will be login in the admin account can easily rest the password...

For Resetting password you can follow two Procedures..
Procedure 1: Goto Start --> Control Panel --> User Accounts.. Now select the account whose password u want to reset.
Procedure 2 : Follow the Next method i.e hacking password through Net User Command.

Note: Hack 1 will only work if Administrator(default) is unsecured i.e User as some other username like above shown figure...


2. Hacking admin or administrator account using net user command
Note: This will work only when user has access of user account or some how he has been allowed  or working in admin account.

Steps to hack admin account:
Step1: Goto the Start and click on Run and Type cmd and press enter ... 
Step 2: Now type "net user" in the command prompt to obtain the All accounts on that computer.. as shown in figure..

how to hack admin password,reset admin password,hack computer password,windows password hacking


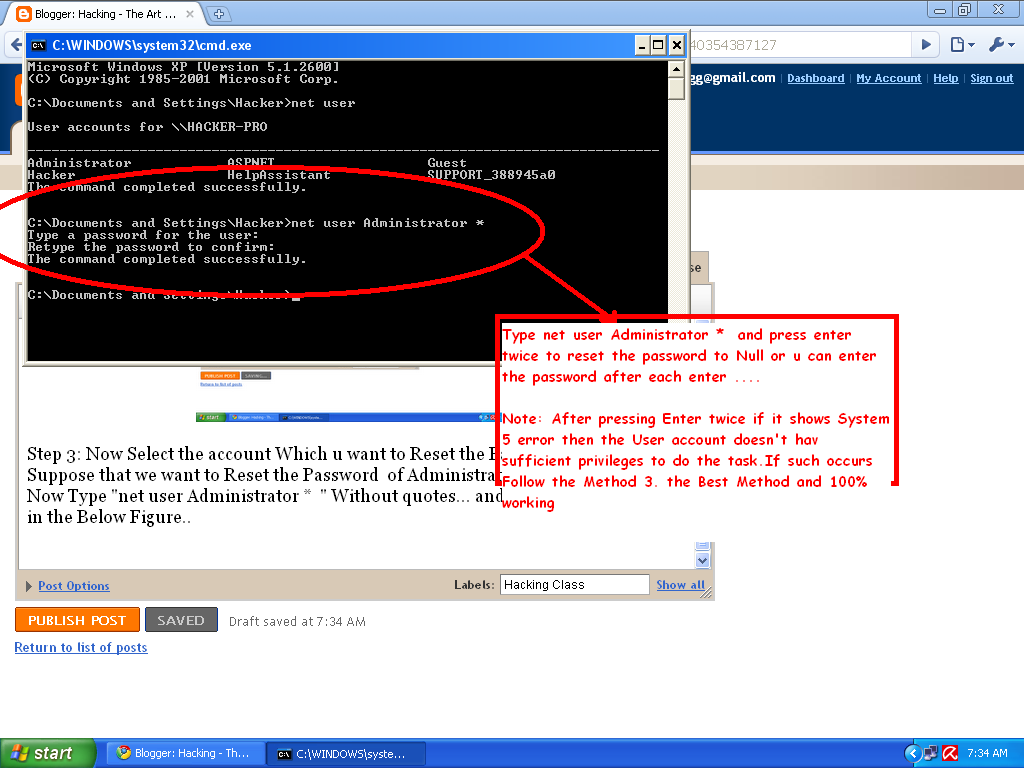
Step 3: Now Select the account Which u want to Reset the Password...
Suppose that we want to Reset the Password  of Administrator...
Now Type "net user Administrator *  " Without quotes... and press Enter. As shown in the Below Figure..

reset admin password,hack computer password,windows password hacking

Step 4: Now after that press Enter Twice to rest the password. Now Next time u open that Account .. It will not require any Password..


3. Hacking admin account using ERD commander (100% working hack)
This hack has no restrictions , using this hack you can hack each and every computer.

First of all Download the ERD(Emergency Rescue Disk)  commander... Extract the Files and Make a CD...

STEPS INVOLVED :
1. Insert the ERD Commander Boot CD into the drive and restart the system
2. Boot the computer using ERD Commander Boot CD. You may have to set the boot order in the BIOS first.
3. Select your Windows XP installation from the list as shown.


How to hack Admin Account
4. From the ERD Commander menu (Start menu), click System Tools and click Locksmith
How to hack Admin Account

5. Click Next

How to hack Admin Account

6. Select the administrator account from the list for which you want to reset the password.
How to hack Admin Account

7. Type the new password in both the boxes, click Next and click Finish

How to hack Admin Account

8 . Restart The System and take the CD out of the Drive..And Enjoy Admin account...

Method 4: Resetting windows password using Ubuntu Live CD or DVD
For this hack you will require the Ubuntu Live CD. 

Steps involved :
 
  1. Insert Ubuntu Live CD and boot from it.
  2. Open terminal and install chntpw in Ubuntu. To do so use the following commands.
    sudo apt-get update
    sudo apt-get install chntpw
  3. Now mount your Windows volume. In my case it was dev/sda1. Replace it with yours.
    sudo mkdir /media/WINDOWS
    sudo mount /dev/sda1 /media/WINDOWS
  4. Now navigate to the Windows configuration folder.
    cd /media/WINDOWS/WINDOWS/system32/config/
  5. To reset the administrator password enter
    sudo chntpw SAM
  6. After completing this command you will see 5 different choices. Select the 1st one and press Enter and its done. 
  7. Now restart your system, it will not ask any password

0 comments:

Comment here / Ask your Query !!

How to Create Your Own Customized Run Commands

Create Customized Run commands

The Run command on Microsoft Windows operating system allows you to directly open an application or document with just a single command instead of navigating to its location and double-clicking the executable icon. However, it only works for some of the inbuilt Windows programs such as Command prompt (cmd), Calculator (calc) etc.
So, have you ever wondered how to create your own customized Run commands for accessing your favorite programs, files and folders? Well, read on to find out the answer.

Creating the Customized Run Command:

Let me take up an example of how to create a customized run command for opening the Internet explorer. Once you create this command, you should be able to open the Internet explorer just by typing ie in the Run dialog box. Here is how you can do that.
  1. Right-click on your Desktop and select New -> Shortcut.
  2. You will see a “Create Shortcut” Dialog box as shown below
    Create customized Run command
  3. Click on “Browse”, navigate to: Program Files -> Internet Explorer from your Root drive (usually C:\) and select “iexplore” as shown in the above figure and click on “OK”.
  4. Now click on “Next” and type any name for your shortcut. You can choose any name as per your choice; this will be your customized “Run command”. In this case I name my shortcut as “ie“. Click on “Finish”.
  5. You will see a shortcut named ie on your desktop. All you need to do is just copy this shortcut and paste it in your Windows folder (usually “C:/Windows”). Once you have copied the shortcut onto your Windows folder, you can delete the one on your Desktop.
  6. That’s it! From now on, just open the Run dialog box, type ie and hit Enter to open the Internet Explorer.
In this way you can create customized Run commands for any program of your choice. Say ff for Firefox, ym for Yahoo messenger, wmp for Windows media player and so on.
To do this, when you click on “Browse” in the Step-3, just select the target program’s main executable (.exe) file which will usually be located in the “C:\Program Files” folder. Give a simple and short name for this shortcut as per your choice and copy the shortcut file onto the Windows folder as usual. Now just type this short name in the Run dialog box to open the program.
I hope this post has helped you create your own Run commands and use them in your daily life. Pass your comments.

0 comments:

Comment here / Ask your Query !!

Manually Hide any file in JPEG

Hello Friends, today i will explain you how to hide any file behind the JPEG image manually that is without any software. Its a very easy trick and also very useful if you want to send information secretly to your friend. Also its different from stenography as it does hides text behind images or text behind mp3 files. Its universal, you can hide any file, virus or Trojan or anything behind image using this trick


Things that you will need for this trick:
1. Winrar installed on your system.
2. Little knowledge of command prompt.


hide files, hide files in images,how to file virus,hiding trojans


Steps to Hide any File behind JPEG image Manually
 
1. Create an folder into C drive (recommendation is that use this C:\Hidden).

2. Now gather all files that you want to hide in this folder.

3. Now add these all files to compressed .rar file using winrar 
(example myhiddenfiles.rar ).
Note: This rar file should be in the same directory (i.e. C:\Hidden)

4. Now Select the JPEG file that you want to use to hide the above content 
(say myimage.jpg). Put this image file also in the same folder that is in C:\Hidden

5. Now, open Command Prompt (Go to Run and type ‘cmd‘). Make your working directory C:\hidden.
  (When you open CMD you will get like C:\Documents and settings\username (something like this)
 Now type cd.. and press enter and then again type cd.. and press enter. Now you have something like this in cmd  C:\   . Now in front of that type cd "Hidden"  and press enter. )

6. Now type: “COPY /b myimage.jpg + myhiddenfiles.rar outputimage.jpg” (without quotes) - Now, myimage.jpg is the picture you want to show, myhiddenfiles.rar is the file to be hidden, and outputimage.jpg is the file which contains both....

7. Now, after you have done this, you will see a file output.jpg in C:\hidden. Open it (double-click) and it will show the picture you wanted to show. Now try opening the same file with WinRAR, it will show the hidden archive...

This hack will help us to hide things behind the JPG file without any software. i hope you all have liked it. For more such hacks keep visiting.

0 comments:

Comment here / Ask your Query !!

Beginners Guide To Hacking Wireless Networks

Hacking WEP wifi passwords by Nishanth Singamala
Basic Entry into a WEP Encrypted Network

This Tutorial explains EVERYTHING in detail So, it is quite long. Enjoy.

1. Getting the right tools
This Tutorial is in Bt3 But Download The Latest Release Bt4.

Download Backtrack 4. It can be found here:

http://www.backtrack-linux.org/downloads/

 I downloaded the Dvd iso and burned it to a Dvd. Insert your BT4 Dvd/usb drive and reboot your computer into BT4. I always load into the 3rd boot option from the boot menu. (VESA/KDE) You only have a few seconds before it auto-boots into the 1st option so be ready. The 1st option boots too slowly or not at all so always boot from the 2nd or 3rd. Experiment to see what works best for you.

2. Preparing the slave network for attack

Once in BT4, click the tiny black box in the lower left corner to load up a "Konsole" window. Now we must prep your wireless card. 
Type:

airmon-ng

You will see the name of your wireless card. (mine is named "ath0") From here on out, replace "ath0" with the name of your card. 
Now type:

airmon-ng stop ath0

then type:

ifconfig wifi0 down

then:

macchanger --mac 00:11:22:33:44:55 wifi0

then:

airmon-ng start wifi0

What these steps did was to spoof (fake) your mac address so that JUST IN CASE your computeris discovered by someone as you are breaking in, they will not see your REAL mac address. Moving on...
Now it's time to discover some networks to break into.

Type:

airodump-ng ath0

Now you will see a list of wireless networks start to populate. Some will have a better signal than others and it is a good idea to pick one that has a decent signal otherwise it will take forever to crack or you may not be able to crack it at all. 
Once you see the network that you want to crack, do this:

hold down ctrl and type c

This will stop airodump from populating networks and will freeze the screen so that you can see the info that you need.

**Now from here on out, when I tell you to type a command, you need to replace whatever is in parenthesis with what I tell you to from your screen. For example: if i say to type: 
-c (channel) 
then dont actually type in 
-c (channel)
Instead, replace that with whatever the channel number is...so, for example you would type:
-c 6
Can't be much clearer than that...lets continue...

Now find the network that you want to crack and MAKE SURE that it says the encryption for that network is WEP. If it says WPA or any variation of WPA then move on...you can still crack WPA with backtrack and some other tools but it is a whole other ball game and you need to master WEP first.

[Image: airodump.jpg]

Once you've decided on a network, take note of its channel number and bssid. The bssid will look something like this --> 05:gk:30:fo:s9:2n
The Channel number will be under a heading that says "CH".
Now, in the same Konsole window, type:

airodump-ng -c (channel) -w (file name) --bssid (bssid) ath0

the FILE NAME can be whatever you want. This is simply the place that airodump is going to store the packets of info that you receive to later crack. You don't even put in an extension...just pick a random word that you will remember. I usually make mine "wepkey" because I can always remember it. 

**Side Note: if you crack more than one network in the same session, you must have different file names for each one or it won't work. I usually just name them wepkey1, wepkey2, etc.

Once you typed in that last command, the screen of airodump will change and start to show your computer gathering packets. You will also see a heading marked "IV" with a number underneath it. This stands for "Initialization Vector" but in noob terms all this means is "packets of info that contain clues to the password." Once you gain a minimum of 5,000 of these IV's, you can try to crack the password. I've cracked some right at 5,000 and others have taken over 60,000. It just depends on how long and difficult they made the password. 

Now you are thinking, "I'm screwed because my IV's are going up really slowly." Well, don't worry, now we are going to trick the router into giving us HUNDREDS of IV's per second. 

3. Actually cracking the WEP password

Now leave this Konsole window up and running and open up a 2nd Konsole window. In this one type:

aireplay-ng -1 0 -a (bssid) -h 00:11:22:33:44:55 ath0

http://i574.photobucket.com/albums/ss184...eplay1.jpg

This will send some commands to the router that basically cause it to associate with your computer even though you are not officially connected with the password. If this command is successful, you should see about 4 lines of text print out with the last one saying something similar to "Association Successful :-)" If this happens, then good! You are almost there. Now type:

aireplay-ng -3 -b (bssid) -h 00:11:22:33:44:55 ath0

http://i574.photobucket.com/albums/ss184...eplay2.jpg

This will generate a bunch of text and then you will see a line where your computer is gathering a bunch of packets and waiting on ARP and ACK. Don't worry about what these mean...just know that these are your meal tickets. Now you just sit and wait. Once your computer finally gathers an ARP request, it will send it back to the router and begin to generate hundreds of ARP and ACK per second. Sometimes this starts to happen within seconds...sometimes you have to wait up to a few minutes. Just be patient. When it finally does happen, switch back to your first Konsole window and you should see the number underneath the IV starting to rise rapidly. This is great! It means you are almost finished! When this number reaches AT LEAST 5,000 then you can start your password crack. It will probably take more than this but I always start my password cracking at 5,000 just in case they have a really weak password. 

Now you need to open up a 3rd and final Konsole window. This will be where we actually crack the password. Type:

aircrack-ng -b (bssid) (filename)-01.cap

Remember the filename you made up earlier? Mine was "wepkey". Don't put a space in between it and -01.cap here. Type it as you see it. So for me, I would type wepkey-01.cap
Once you have done this you will see aircrack fire up and begin to crack the password. typically you have to wait for more like 10,000 to 20,000 IV's before it will crack. If this is the case, aircrack will test what you've got so far and then it will say something like "not enough IV's. Retry at 10,000." DON'T DO ANYTHING! It will stay running...it is just letting you know that it is on pause until more IV's are gathered. Once you pass the 10,000 mark it will automatically fire up again and try to crack it. If this fails it will say "not enough IV's. Retry at 15,000." and so on until it finally gets it. 

http://i574.photobucket.com/albums/ss184...crack1.jpg

If you do everything correctly up to this point, before too long you will have the password! now if the password looks goofy, dont worry, it will still work. some passwords are saved in ASCII format, in which case, aircrack will show you exactly what characters they typed in for their password. Sometimes, though, the password is saved in HEX format in which case the computer will show you the HEX encryption of the password. It doesn't matter either way, because you can type in either one and it will connect you to the network. 

Take note, though, that the password will always be displayed in aircrack with a colon after every 2 characters. So for instance if the password was "secret", it would be displayed as:
se:cr:et
This would obviously be the ASCII format. If it was a HEX encrypted password that was something like "0FKW9427VF" then it would still display as:
0F:KW:94:27:VF
Just omit the colons from the password, boot back into whatever operating system you use, try to connect to the network and type in the password without the colons and presto! You are in!

It may seem like a lot to deal with if you have never done it, but after a few successful attempts, you will get very quick with it. If I am near a WEP encrypted router with a good signal, I can often crack the password in just a couple of minutes. 

I am not responsible for what you do with this information. Any malicious/illegal activity that you do, falls completely on you because...technically...this is just for you to test the security of your own network. :-)

I will gladly answer any legitimate questions anyone has to the best of my ability.
HOWEVER, I WILL NOT ANSWER ANYONE THAT IS TOO LAZY TO READ THE WHOLE TUT AND JUST ASKS ME SOME QUESTION THAT I CLEARLY ANSWERED. No one wants to hold your hand through this...read the tut and go experiment until you get it right.

There are rare occasions where someone will use WEP encryption with SKA as well. (Shared Key Authentication) If this is the case, additional steps are needed to associate with the router and therefore, the steps I lined out here will not work. I've only seen this once or twice, though, so you probably won't run into it. If I get motivated, I may throw up a tut on how to crack this in the future.
Hacking WEP wifi passwords
By Nishanth Singamala

0 comments:

Comment here / Ask your Query !!